

[ PART 1 ] Gentoo is not HARD to install


This tutorial will show you how to make a "SECURE" installation of Gentoo in Virtualbox. We are going to explain how to install Gentoo in a concise yet precise language, with simple to follow instructions. The official manual is available here . Feel free to refer to it anytime you don't understand something properly. It usually goes into much more detail, but it doesn't implement the security settings we do in this tutorial.
If you are here, it’s probably because you are looking for an article explaining how to install Gentoo on an encrypted partition, in a very simple common language.
Well you are at the good place, we are going to bring down all the technical terms into a natural common language to understand the backstage of Gentoo installation.
What is Gentoo?
Gentoo is a GNU/Linux distro known by installing everything manually from scratch with the ability of customizing this installation, whether installing the OS itself or different softwares. It has a lot of benefits, we can state some of them:
- Stable & fast
- Controlable & customizable
What do we need to install Gentoo?
- A minimal Installation file of Gentoo (less than 350 MiB); you can download it from Gentoo website.
- Virtualization software either VMWare, (more performant, but not free) or VirtualBox. Since we love everything FREE, I am going to use VirtualBox.
- Most importantly you need to be Patient and Curious.
How does Gentoo work
Whereas others distros are pre-compiled OSs; meaning if you want to install a piece of software you don't usually compile it yourself. Instead, you use a precompiled binary and just install it using a package manage (like apt, pacman).
In Gentoo ( which is a compiled OS ), the user himself needs to do the job of making config files, solving dependencies and compiling of his chosen software, including the kernel itself, on his own machine. This process takes time, but it will make your OS most probably quicker and according to your needs.
Installation
For Linux systems like Ubuntu or Fedora, installation can be done in 2 ways: either with a user-friendly interface or using a command prompt known as terminal. For the first option, the installation is simple because the software guides you. The only settings that have to be made, are
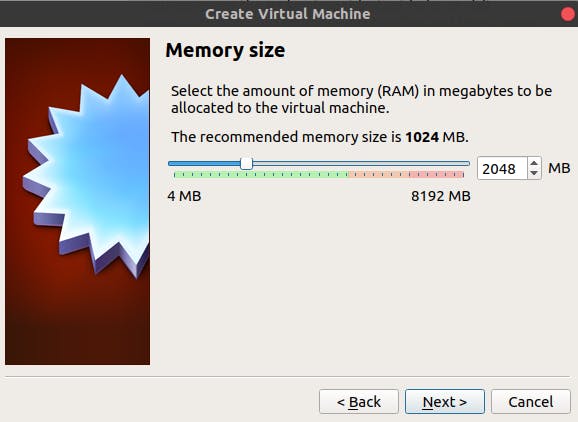
- Set our VM RAM, we are giving it 2 GB of RAM, you can choose your own value, but not less than 256 MB.
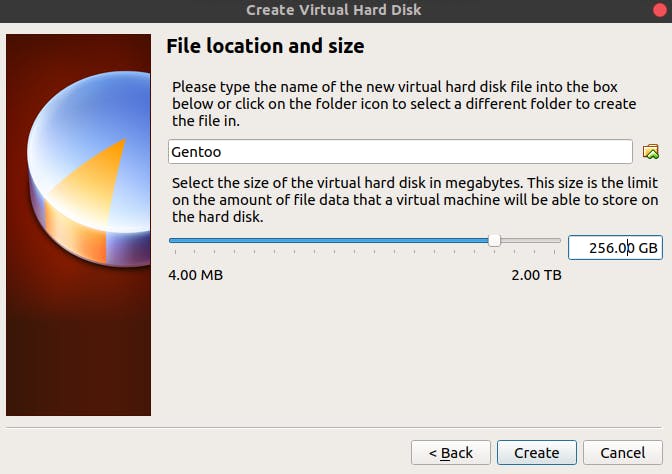
- Select the disk space, we are going for 256 GB you can give as much as you can. Since we have chosen dynamically allocated hard disk file, it will not occupy all of the 256 GB, don't worry
We need to install our OS in a hard disk partition. We can either install our OS in one single partition which is risky, because if our system crashes we will need to reinstall it again, the safer way is to install the OS using 3 partitions as follow:
By running: ls /dev/sd or ls /dev/hd we figure out that for example /dev/sda is our hard disk
Finally, we apply the updates of the whole environment with:
env update && source /etc/profile
With these settings, you will have a ready to use Environment after the installation.
In Gentoo we need to go through everything by hand, from the kernel till the network configuration. The same process when installing different softwares on the machine instead of downloading a package already defined Gentoo will download the code source for that software , and if you are experienced enough to delete some features of the code downloaded, well you can do it and then compile the code to have the software as you prefer. One of the Strengths of Gentoo.
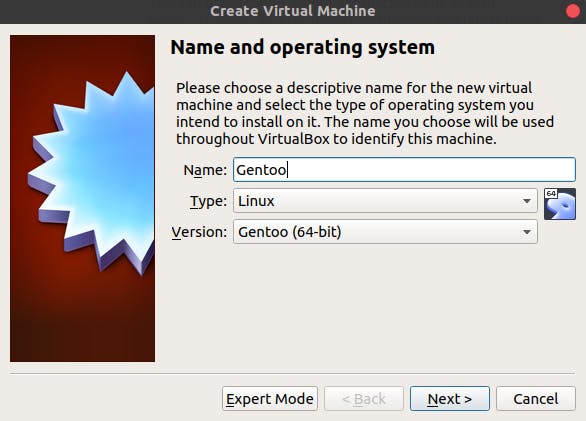
We can start now with the installation process: We have to prepare our virtual machine at first as follow:
- Name our VM
- Set our VM RAM, we are giving it 2GO of ram, you can choose how much you can give
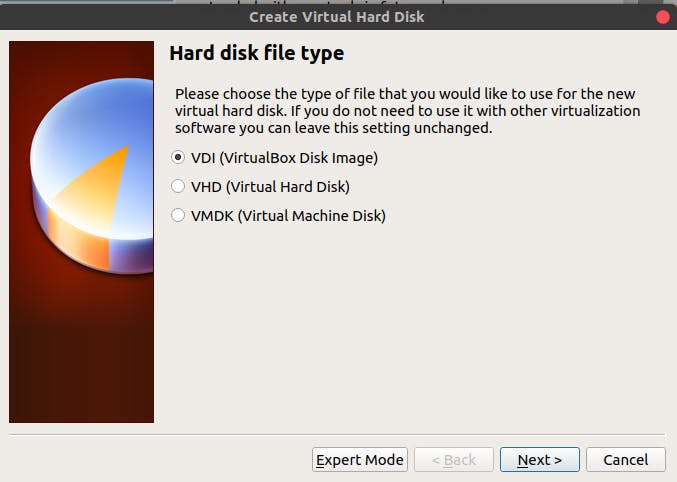
- Then choose as follow

- Choose dynamically
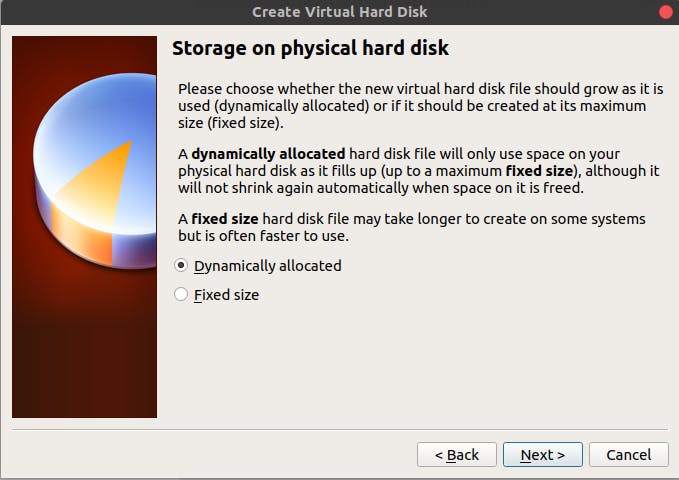
- Give the disk space, we are giving 256GO you can give as much as you can since we have chosen dynamically it will not occupy of the 256 don't worry
- Now we start our new VM by double clicking it or by selecting it and clicking on Start

We need to install our OS in a hard disk partition, here we have options; we can install our OS in one single partition which is really bad because if our system is crushed we will need to reinstall it again, however the best way to install the OS is using 3 partitions as follow:
- One partition for the boot: contains the necessary file to start up
- The second for swap: which is using part of our hard disk to act as a RAM in case the latter is full.
- The third is for storing our data.
We need to make sure that /mnt/gentoo exists
ls /mnt
Identification the hard disk then start partitioning it this way:
By doing a: ls /dev/sd or ls /dev/hd we figure out that /dev/sda is our hard disk
We will create 3 primary partitions /dev/sda1 => /boot => 128mb => bootable, contains grub boot manager, kernel and the decryption software (cryptsetup)
ls /dev/sd*
ls /dev/hd*
# after find out your hard disk, do:
fdisk /dev/sda
# /dev/sda1 => /boot
# /dev/sda2 => swap (2gb)
# /dev/sda3 => / => encrypted
- We can type h (help) for showing all the options, we are going to use options :
n: to create new partition.
we specify the size of the patition by "+number(M: mebabytes, G: Gigabytes ), in our case it's going to be +128M for partition 1, +2G for the second and the last partiton just hit ENTER to give it the rest of memory space.
p: to print the partitions
w: to save the partitions when we finish adding them as follow

We can check our partition after writing them on our virtual disk by typing:
fdisk -lNow we have to encrypt our third partition (data partition) the /dev/sda3, the reason behind that is security; we can take the example of getting our computer stolen so no one can access the data inside the hard disk because it it encrypted and locked. We will use luksFormat to do that as follow:
cryptsetup -s 512 luksFormat /dev/sda3Here we encrypt the partition /dev/sda3 by the passphrase ( is used to unlock the partition ) entered
Since the partition is encrypted, it needs to be openned, using that passphrase. We should give it a name to be accessible at the /dev/mapper/name
cryptsetup luksOpen /dev/sda3 root
#we can check it by:
ls /dev/mapper

We need to format those partitions using the mkfs & mkswap command as follow:
/dev/sda1
mkfs.ext2 /dev/sda1/dev/sda2
mkswap /dev/sda2/dev/mapper/root
mkfs.ext4 /dev/mapper/root

Now we can mount our partitions and start putting files inside
mount /dev/mapper/root /mnt/gentoo
swapon /dev/sda2

Remember, we downloaded a minimal installation file of Gentoo which doesn't contain all the files necessary for its installation. To remedy that, we should download stage3 archive using links tool:
We are going to use the links tool as follows :
links https://gentoo.org/downloads/

We should unzip it in /mnt/gentoo : Normally the downloaded file is located in ~ so we should move it
mv ~/stage3* /mnt/gentoo
#then unzip after changing the directory to /mnt/gentoo
cd /mnt/gentoo
tar xpvf stage3*.tar.xz
Then
We are at: Chrooting "changing the root"
First we need to copy the Portage configuration ( contains the "emerge" ) to the configuration folder. Portage is the system used for downloading and installing softwares in Gentoo.
By creating the repos.conf in /mnt/gentoo/ect/portage
mkdir /mnt/gentoo/etc/portage/repos.confcp /mnt/gentoo/usr/share/portage/config/repos.conf /mnt/gentoo/etc/portage/repos.conf/gentoo.conf
For faster download speed, you can select the closest mirror to your region:
mirrorselect -i -o >> /mnt/gentoo/etc/portage/make.conf
We make sure that the newly installed gentoo environment has the correct DNS server config, then we prepare the environment for Chrooting by mounting /proc , /sys & /dev:
cp /etc/resolv.conf /mnt/gentoo/etc/
mount --types proc /proc /mnt/gentoo/proc
mount --rbind /sys /mnt/gentoo/sys
mount --make-rslave /mnt/gentoo/sys
mount --rbind /dev /mnt/gentoo/dev
mount --make-rslave /mnt/gentoo/dev

Changing to the new envirement: chrooting. Once in the chroot, we can now continue with mounting our boot partition:
chroot /mnt/gentoo /bin/bash
source /etc/profile
mount /dev/sda1 /boot

Then updating your @world packages (all installed packages):
emerge-webrsync

Setting the timezone: from /usr/share/zoneinfo we find our timezone to be Europe/Paris ( I'm in paris now :3 )
echo "Europe/Paris" > /etc/timezone
emerge --config timezone-data

Here we should set the default system language, apps language, measure metrics, money signs, ...): opening the locale.gen file & edit it:
nano /etc/locale.genchoose your preferred language, uncomment the right lines: mine is US english
    en_US ISO-8859-1
    en_US.UTF-8 UTF-8
Then, we generate them:
locale-genand apply them:
eselect locale listand select: the en_US.utf8
eselect locale set en_US.utf8fianally we apply Finally, we apply the updates the of whole environment with:
env-update && source /etc/profile

Now we download the linux sources ( kernel ):
emerge gentoo-sources

After successfully downloading the kernel we change our directory and move to the linux sources folder:
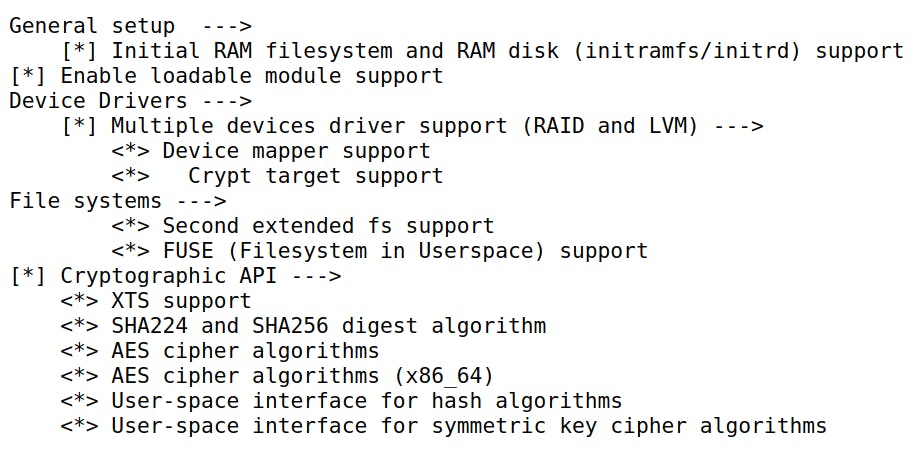
cd /usr/src/linuxAnd start the kernel configuration menu to choose features that we want to built in our kernel or as module to the kernel or just remove what is not wanted to be installed.
make menuconfig
We need to make sure that our cryptographic features are enabled so the encrypted /dev/sda3 partition is correctly decrypted
To enable a feature, you have 2 options: <*> my module => press space bar or "y", this will make the feature built-in <M> my module => press "m", this will build the feature as module
Following this setup tree below:

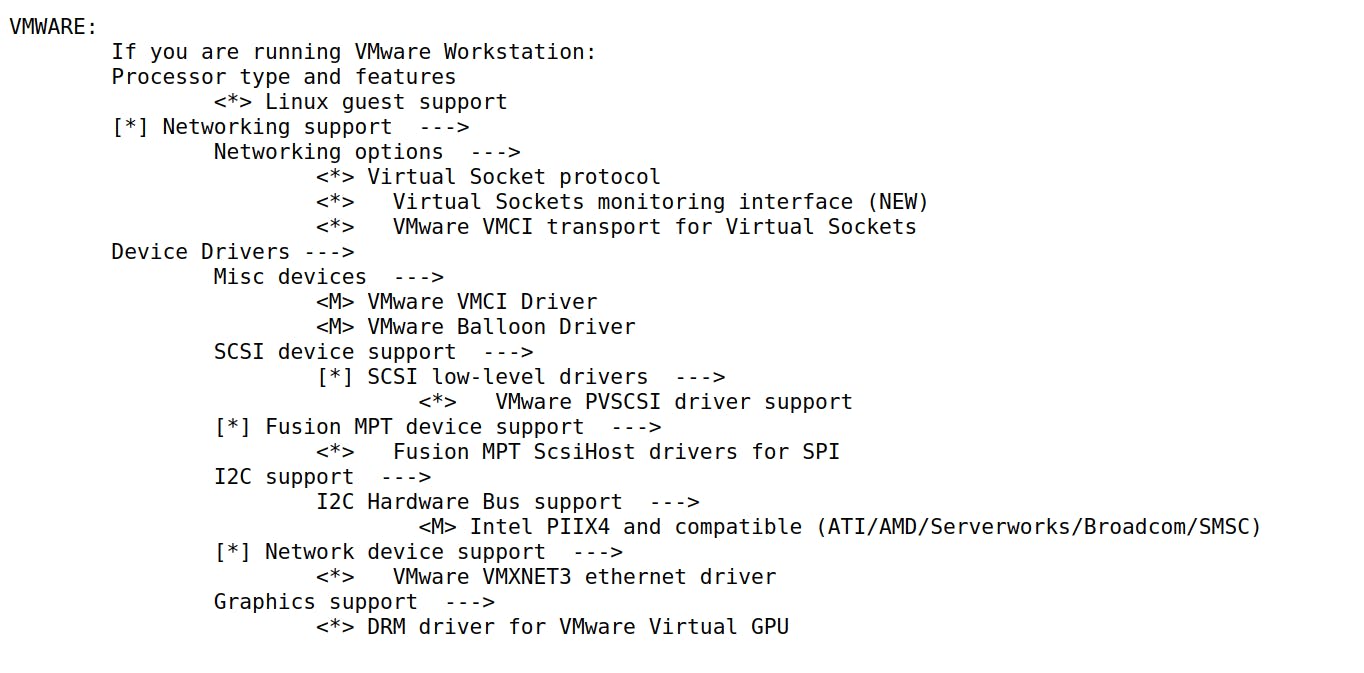
We have some aditional features needed to be set up while installing in a virtual machine:
for VIRTUALBOX:

for VMWARE:

Once we finished applying those features we save and exit that menuconfig we can compile our kernel using these commands:
make
make modules
make modules_install
make install
Be PATIENT it takes some time


Once done with the four commands, we can check that the new kernel is in /boot using: ls -lh /boot. We should now install the genkernel ( genkernel is a tool created by Gentoo used to automate the build process of the kernel and initramfs ) with the support of cryptsetup by adding the USE flags so it becomes a dependency of genkernel and gets installed to decrypt our partition /dev/sda3 at boot Edit the file /etc/portage/make.conf by adding this:
USE="cryptsetup"
USE FLAGS : as one can infer from the name, are keywords inserted in make.conf in order to tell Portage what capabilities you want your system to offer. So everytime we want to install let's say a software in our system, it will be installed based on those defined flags.

Then we generate the initramfs; which does the decryption of /dev/sda3 for us.
emerge --autounmask-write genkernel#followed by dispatch-conf => to apply the new configuration (press "u" to confirm the changes)
Then re-run:
emerge genkernel
genkernel --luks --install initramfs


We need to setup/configure the partitions scheme in /etc/fstab : this file's name stands for FileSystem TABle and it lists filesystems to mount automatically at boot, their mount points and options. Be careful editing it!
nano /etc/fstab

We setup GRUB boot manager:
- Installing the grub
emerge grub

- Configure the grub configuration file /etc/default/grub with the encryption of /dev/sda3:
Editing the file /etc/default/grub by adding:
GRUB_CMDLINE_LINUX="crypt_root=/dev/sda3"
Then
grub-install /dev/sda
grub-mkconfig -o /boot/grub/grub.cfg


- We make sure that required files for networking are installed: DHCP
emerge dhcp
The network interface name (eg. enp0s3) can be obtained using: ifconfig. Then we edit the /etc/conf.d/net file we add: config_enp0s3="dhcp"

- Enable automatic networking start at the boot:
cd /etc/init.d
ln -s net.lo net.enp0s3
rc-update add net.enp0s3 default
Set up your hostname, edit the file /etc/conf.d/hostname: for me I chose it to be "gentoovm" you can choose whatever you want
nano /etc/conf.d/hostname
#add this: hostname="gentoovm"
Then edit the hosts /etc/hosts edit this line by adding your new host name: "127.0.0.1 localhost gentoovm"

Set the keymaps settings if required add your preference :
nano /etc/conf.d/keymaps
keymap="uk"
Install cron and log managers:
emerge cronie sysklogd
Add them to boot list by running:
rc-update add cronie default
rc-update add sysklogd default
>
Finally, we set a password for root and reboot:
passwd root
Exit the chroot: with the exit command, after we should umount all mounted devices mounted before:
umount /mnt/gentoo/boot
umount /mnt/gentoo/proc
umount -R /mnt/gentoo/dev
umount -R /mnt/gentoo/sys
cd /
umount /mnt/gentoo
Finally we are DONE
- Last but not least step in this first section is rebooting and we will be redirected to the grub interface, hit ENTER and then we should decrypt "unlock" our data partition in the "/dev/mapper/root" using our passphrase as follow
rebootWhen rebooting make sure to change the setting in our VirtualMachine: we need to disable booting from CD, following this : Setting > System > Motherboard > uncheck the Optical option in the boot order box.

Second Part link
To complete the installation follow the next steps here
End of part one THANKS FOR READING.
If you have any problems comment them down I will do my best to help you!
See you in [PART 2]