Installing Bettercap


How to Install bettercap?
Bettercap is available on different platforms such as GNU/Linux, MacOS, Microsoft Windows, BSD and Android.
Since in this article we are going to perform our task on a Linux distrubution, we have to install the following dependencies:
- build-essential
- ruby-dev
- libpcap-dev
- libusb-1.0-0
- libnetfilter-queue
Code:
Install it using a package manager: "apt, pacman,..". I am using a Debian based distro (ubuntu or kali..) so:
sudo apt install build-essential ruby-dev lipcap-dev
Once the dependencies are installed, install bettercap:
sudo apt install bettercap
Or we can install bettercap with ruby package manager - works with most of GNU/Linux distros- as follows:
sudo gem install bettercap
Another way of installing Bettercap:
It is also possible to fetch the source code and compile it on your own. For that, make sure that:
- You have a correctly configured Go (version >=1.8) environment
- $GOPATH is defined and $GOPATH/bin is in $PATH
You will also need to install these dependencies:
- build-essential
- libpcap-dev
- libsusb-1.0-0-dev (required by the HID module)
- libnetfilter-queue-dev(on Linux only, required by the packet.proxy module)
Once you’ve met all the conditions stated above, you can run the following commands to compile and install bettercap in /usr/local/bettercap
go get github.com/bettercap/bettercap
cd $GOPATH/src/github.com/bettercap/bettercap
make build
sudo make install
Starting Bettercap:
To see how we can use bettercap , we can verify the help section:
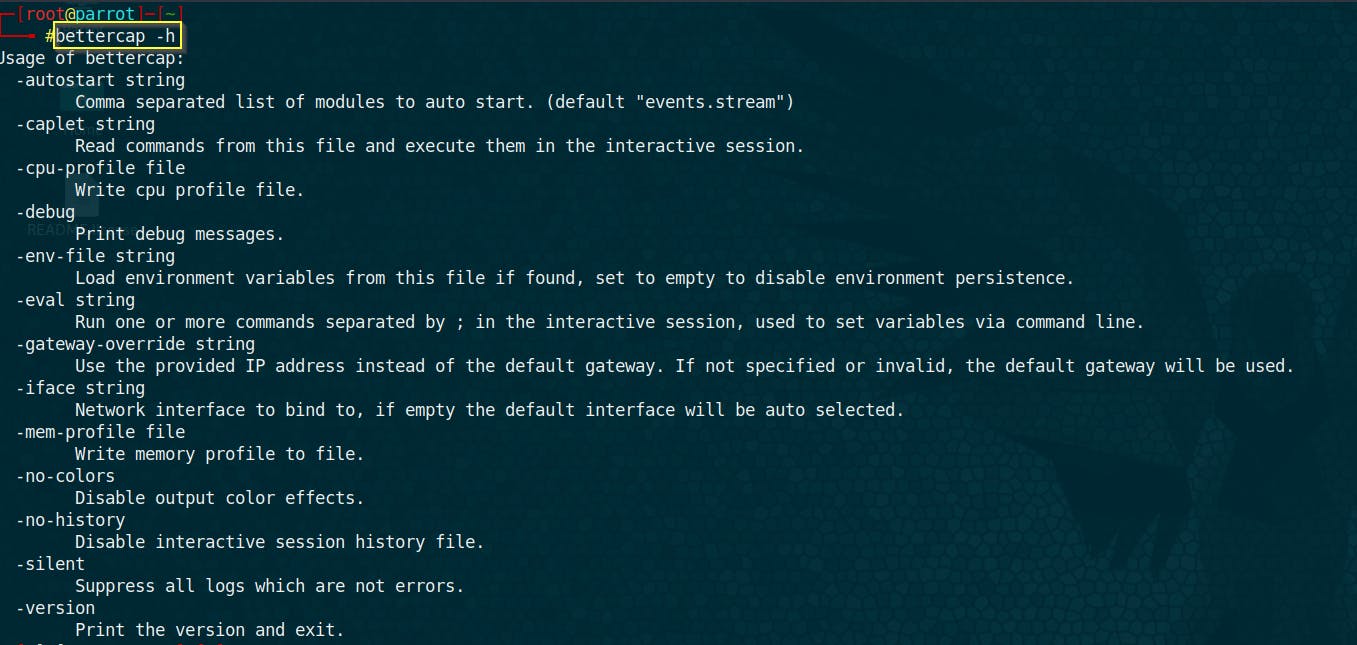
To launch bettercap, open the terminal and type "bettercap":
bettercap
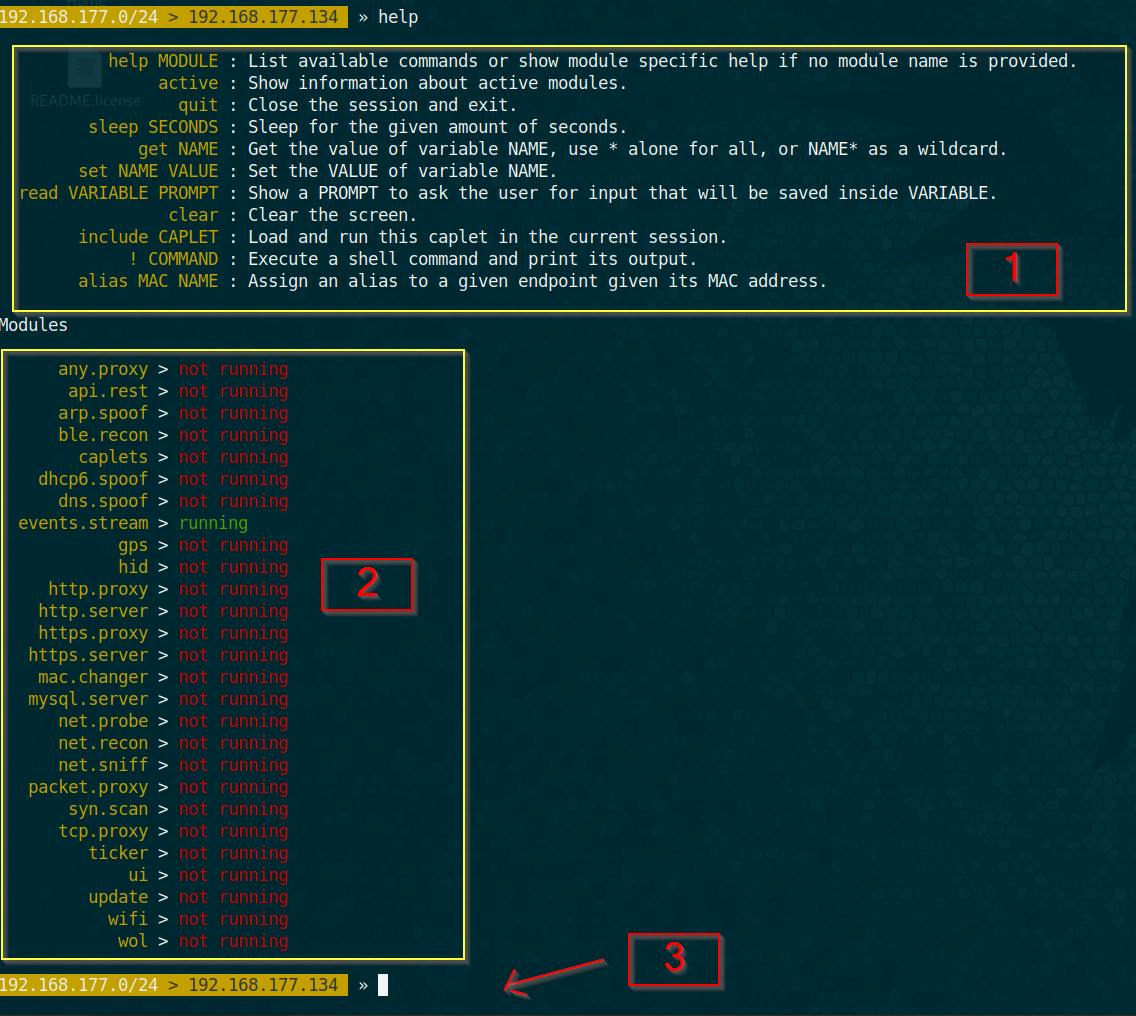
Naturally you will get a prompt in your shell. For more information about how to use it , hit "help", as follows:
help
We can see that we have 3 main sections, the first part is some hints/help for how general use of bettercap. The second is the list of all modules available in the framework and finally the last part is the shell prompt waiting for you.
What is a module?
Modules are the different tools available in the pack to perform different types of attacks. In reality , modules are the hearts of Bettercap. To know how to use a module, it can be done using the command "help", which gives the manual usage for the module: "help <NAME_OF_MODULE>" For instance, to use the module called "any.proxy", use:
help any.proxy
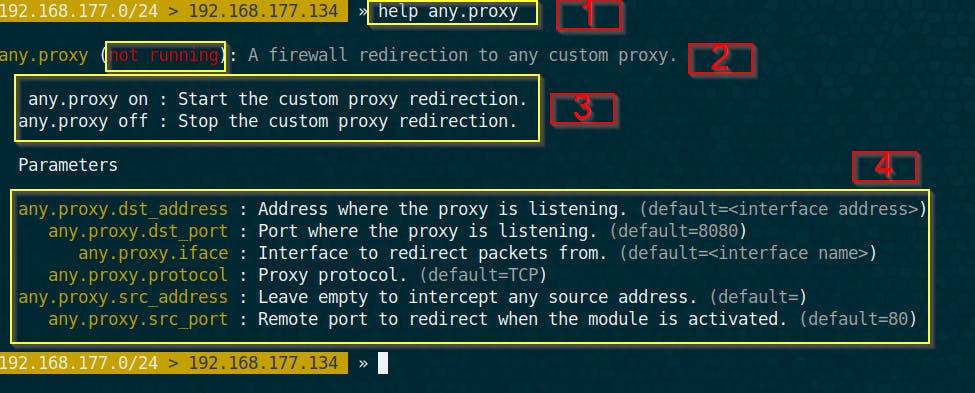
As an output, you notice various sections. Let’s see what these sections means:
- Section 1: is the help command we typed previously.
- Section 2: is the state of the module. It indicates either a module is running or not.
- Section 3: shows how to launch this modules. To run a module, we type the name_of_module followed by on to run it or off to stop it. So for this case any.proxy on to launch the module and any.proxy off to stop it.
- Section 4: indicates the different options available for a module. To use an option, nothing simple than type the keyword set followed by name_of_the_option and state true/false. For instance, in our case, if we want to define the source port we are going to use the module any.proxy.src_port as follows : set any.proxy.src_port true. Same syntax goes for the all the options of the module.
Warning: make sure to define the options before launching the module otherwise you will get the default options that are all disabled.
After defining your options you can start a module by typing the name of the module followed by the keyword « on » :
any.proxy on
Now it is easier to navigate through this Swiss Army Knife bettercap, we can dive deeper and discover advanced utilities. Examples that are shown are as follow:
- Change our mac address.
- Arp spoofing.
- DNS spoofing.
- Script automation with caplets.
- Network sniffing.
Thank you for reading I hope it was useful, you can check other articles.